Firefox is experiencing a resurgence since the news of Chromium based browsers weakening ad blocking extensions has hit the public consciousness.
You may be one of the people switching to Firefox, or may be looking to help a family member who is less interested in browsers than you are – but you want to make sure that they are safe on the web, especially with the rise in internet scams. Beginner here refers to someone who is new to Firefox (at least within the last few years). Even if you are experienced with web browsers, you may still learn something new about Firefox.
Install
As a novice, the recommended release channel of Firefox is the release channel. Hopefully, you already have it installed, but if not, head on over to the Firefox Download page to download and install Firefox.
Make sure not to remove your old browser (yet).
Switch
The first time you run Firefox, an import wizard should pop up. Follow the steps on Mozilla’s site to import your old browser’s data. If you previously had Firefox installed and want to clean up first, you can Refresh Firefox instead, to reset your settings while keeping your data. You can then follow up to import the data from your old browser.
Set up Sync and Mobile Devices
You probably want your Firefox data on the go – bookmarks, logins, and to be able to send pages to your other devices – you’re going to want to get a Firefox Account and set up Sync on another device (or more).
Check out the help pages on Sync and get it set up. Once you are done, you can set up Firefox syncing on your Android (Google Play, FFUpdater) or iOS (App Store) device.
Unlike other browsers, Firefox Sync is encrypted with zero-knowledge encryption – that means that no one but you will see your passwords, or your browsing history. That is unlike most competitors. Just another way that Firefox (and Mozilla) are looking out for you.
Customizing Settings
Firefox comes with good defaults, and they are chosen to ensure that most people have a satisfactory experience with Firefox. Every person that uses Firefox is going to have a slightly different opinion of whether the defaults are the best choices for them – and I’m no different.
We’ll walk through a couple of changes in the settings – start by navigating to the Settings page, either by navigating to the ☰ menu and clicking Settings, or by typing about:preferences in your address bar and pressing the enter key to navigate to it.
Open previous windows and tabs
In the General section of the preferences, check the Open previous windows and tabs checkbox. This option restores your opened tabs and windows the next time you start Firefox after closing it.
One thing I have learned from beginners using Firefox is that they don’t know how to shut down Firefox. No, I’m not kidding 🤪!
People are used to clicking the ❎ symbol on Firefox windows and wondering where those windows have gone once they restart Firefox. You can prevent this confusion by exiting Firefox via the ☰ menu: click the ☰ menu, then choose Exit on Windows or Quit on Linux.
On macOS, you can also use the Firefox menu and the Quit Firefox option.
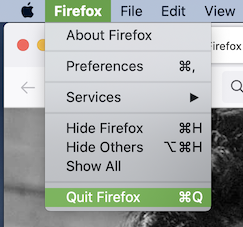
The next time you start Firefox, your previously opened windows will be restored.
Default Search Engine
Firefox comes with Google as its default search engine in most of the world, and while Google is a good search engine, it is also one of the biggest players in the online ad industry. You may not want to share your searches with Google, especially if you use other Google services.
Fortunately, Firefox also comes with a more privacy aware search engine, DuckDuckGo, which you can default your searches to pretty easily:
- Go to about:preferences, or navigate to it by clicking the ≡ button, then selecting Settings.
- Navigate to the Search section.
- Under Default Search Engine, select DuckDuckGo from the dropdown menu.

As with everything else in this guide, this is totally optional, and some people really prefer Google’s search results. If you don’t like the setting, it is easy to undo, so feel free to come back if you need help with that.
Although this guide recommends the DuckDuckGo search engine, I don’t recommend DuckDuckGo Privacy Essentials – it is fine, but there are better alternatives. Running this extension alongside those alternatives can cause problems, so I recommend against it.
Search Suggestions
If you are like most people, you are visiting a lot of the same sites on a day to day basis. Firefox can help you find the sites you use most often by prioritizing them in the address bar results.
In the Search section of the preferences, uncheck the Show search suggestions ahead of browsing history in address bar results checkbox. This will make it so that you see your previously visited pages ahead of search suggestions from your default search engine.
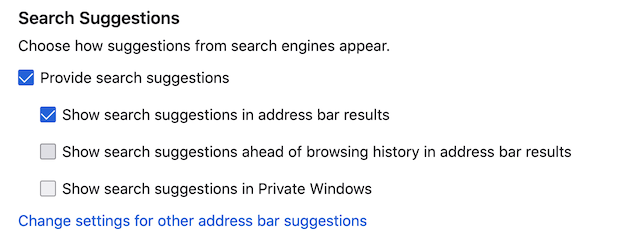
Compact Density
If you are using a low resolution screen, or you simply prefer to minimize the space taken up by toolbars, you can try out the (unsupported) compact density in Firefox.
You can follow the steps on the Support Mozilla page, or if you are okay with using the about:config UI, you can:
- set browser.compactmode.show to true
- set browser.uidensity to 1


Differences From Your Previous Browser
Sometimes, switching can be challenging. The things you are used to are just slightly different – rearranged to places you may not have thought to look. I’ll walk through some of the differences that seem to trip up beginners that are used to different browsers.
Recently Closed Windows
While Chromium derivative browsers have a single keyboard shortcut for restoring closed tabs and windows (you can keep pressing the same shortcut to bring back all of the tabs in closed windows), Firefox has a separate keyboard shortcut for bringing back closed windows.
If you didn’t already know the shortcut to restore closed tabs, it is:
- Control-Shift-T on Windows and Linux
- ⌘-Shift-T on macOS
To restore closed windows instead, the shortcut is:
- Control-Shift-N on Windows and Linux
- ⌘-Shift-N on macOS
Private Browsing Windows (aka Incognito)
If you looked at the previous difference (recently closed windows), you may have noticed that the keyboard shortcut for restoring closed windows in Firefox is the same as the one you might have used to open a new “Incognito” window in Chrome (other browsers may call this something different).
In Firefox, what you might recognize as Incognito mode is known as Private Browsing, and the windows are called Private Windows. To open a Private Window in Firefox, the shortcut is:
- Control-Shift-P on Windows and Linux
- ⌘-Shift-P on macOS
Profile Manager
You may be using multiple profiles in Chromium browsers, and at first glance, it may seem like profiles don’t exist on Firefox.
Profiles are a way to set up parallel instances of your browser – with separate settings, bookmarks, extensions, logins and themes. The most common way people use them is to separate between their personal setup and their work/school setup.
Firefox has had profile support since its first versions – and it shows, since it isn’t as easy to use as the one in competing browsers. Thankfully, it works and will let you do what you need to do.
But First – How Many Profiles Do You Need?
Before we get into the details of setting up a new profile, ask yourself how many profiles you need. If you are like most people and need only two profiles – like for personal data and for work data, there is an easier way to handle that than to create multiple profiles.
If two profiles will suffice, I recommend installing a second copy of Firefox – Firefox Developer Edition.

Don’t let the “developer” name scare you – Firefox Developer Edition is basically a beta version of Firefox that includes some small tweaks to help web developers do their work. Since it is based on Firefox beta, I recommend using it for your personal profile. You always have a backup in the release version of Firefox if anything goes wrong.
The setup is very simple. Download Firefox Developer Edition and keep your data separate. If you plan on using Firefox Sync for both profiles, you will want to use separate accounts (using different email addresses) to ensure that you don’t merge the data between the different profiles. By default, Firefox and Firefox Developer Edition use different profiles and have different taskbar/dock icons, so they are easy to keep separate.
If you need more than two profiles, or you can’t deal with beta software, you can instead read on to learn about how to create profiles from within Firefox.
The about:profiles Profile Manager
The most recent addition to Firefox’s profile management features is its in browser profile manager, accessible by navigating to about:profiles.
There is some good documentation on the profile manager – on this page, you can create, manage, and launch profiles.
While there are other ways to manage profiles in Firefox, I think about:profiles is the simplest to use, and it is what I use personally.

If you are running Windows, you may want to see your profiles in separate icons in the taskbar. To accomplish this, set taskbar.grouping.useprofile to true in about:config.
You can vote for a friendlier profile management UI on Mozilla Connect.
Features You May Not Know About
Firefox has been around a long time, but if you haven’t used it recently, you may not know about some of its best features. While competing browsers continue to borrow features from Firefox, keep reading for some of the best features that you may not have seen before.
Screenshots
Being able to take screenshots may seem like a pretty basic feature, but other browsers don’t usually make it too easy. Sure, you can take a screenshot of your browser window – but how about a picture of a table, or a specific section of a page – or even the full page?
I use this feature all the time to keep records of things like order confirmations, or times when I want to save a specific part of a page.
To use it, context-click on a page and select the Take Screenshot option. You can also add a button to your toolbar.
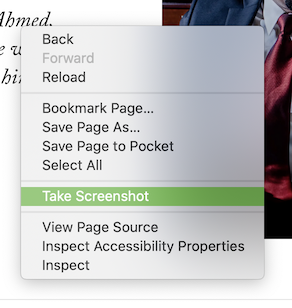
After that, you can choose to save a rectangular selection, the currently visible part of the page, or the whole page.
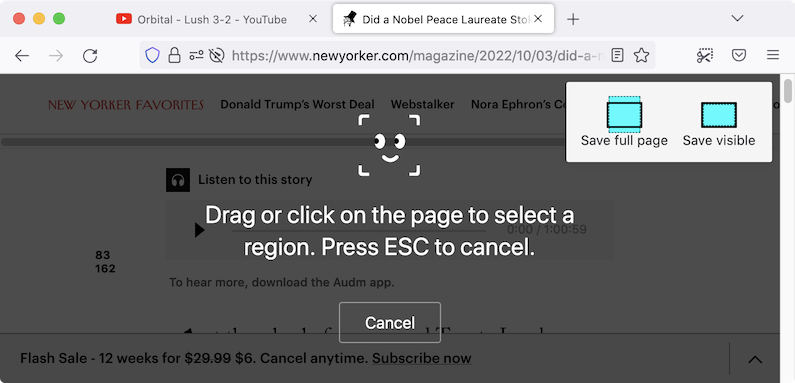
There’s even a nice keyboard shortcut if you take screenshots often:
- Control-Shift-S on Windows and Linux
- ⌘-Shift-S on macOS
The AwesomeBar (Address Bar and Search)
The AwesomeBar is the name that Mozilla affectionately called the Firefox address bar back in 2008 – and for good reason, as the Firefox address bar remains awesome today.
Search Alternatives
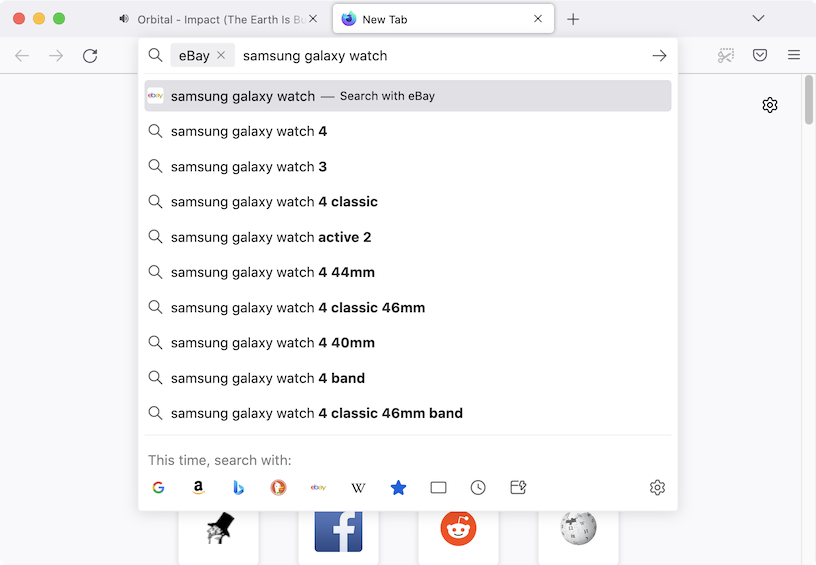
Firefox comes with a few built in search engines, like Wikipedia, Google, Amazon and eBay. While a search engine like Google is good at general queries, Wikipedia is good for encyclopedic searches, and Amazon and eBay are good for shopping.
Firefox makes it really easy to search on a search engine that isn’t your default – as you are doing your search, before, during, or after typing your query.
If you know you are searching eBay before typing your search query, you can type @ebay and your search. If you decide that you want to search eBay after you type your query, you can Tab to the eBay icon, or click on the eBay icon below your search suggestions.
This is an incredibly powerful and useful feature that saves you the time of heading to your primary search engine and searching for “ebay shoes” – or whatever your query might be.
Changing What the Address Bar Shows On the Fly
The awesomebar becomes really awesome when you being using “restriction tokens” to control what results the address bar shows you. That sounds complicated, but it is addictive once you get the hang of it. Basically, you can type a certain character before your search to tell Firefox what to show you.
In the screenshot below, I typed * and space to show me results from my bookmarks.
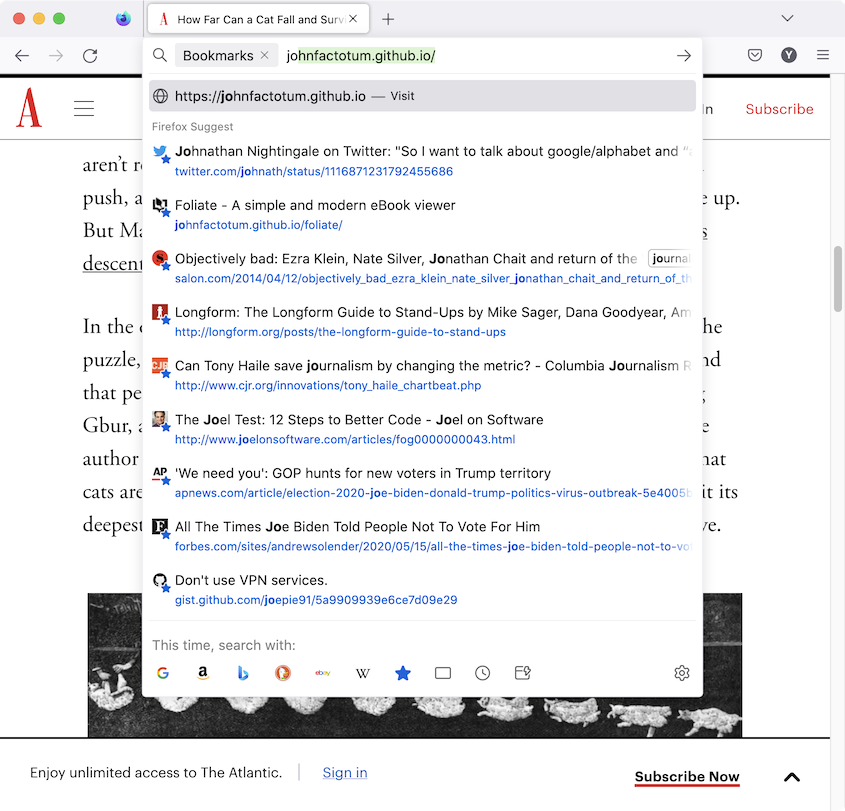
One of the other restriction tokens I use all the time is % to search my open tabs – it makes it so I don’t have to waste any mental energy or time to organize my tabs – I can just search for it, like I would on a search engine. Who needs hierarchies or groups?
The complete list of tokens are:
- ^ to show only matches in your browsing history.
- * to show only matches in your bookmarks.
- + to show only matches in bookmarks you’ve tagged.
- % to show only matches in your currently open tabs.
- # to show only matches where every search term is part of the title or part of a tag.
- $ to show only matches where every search term is part of the web address (URL). The text “https://” or “http://” in the URL is ignored, but not “file:///”.
- ? to show only search suggestions.
Picture-in-Picture & Multi-PiP
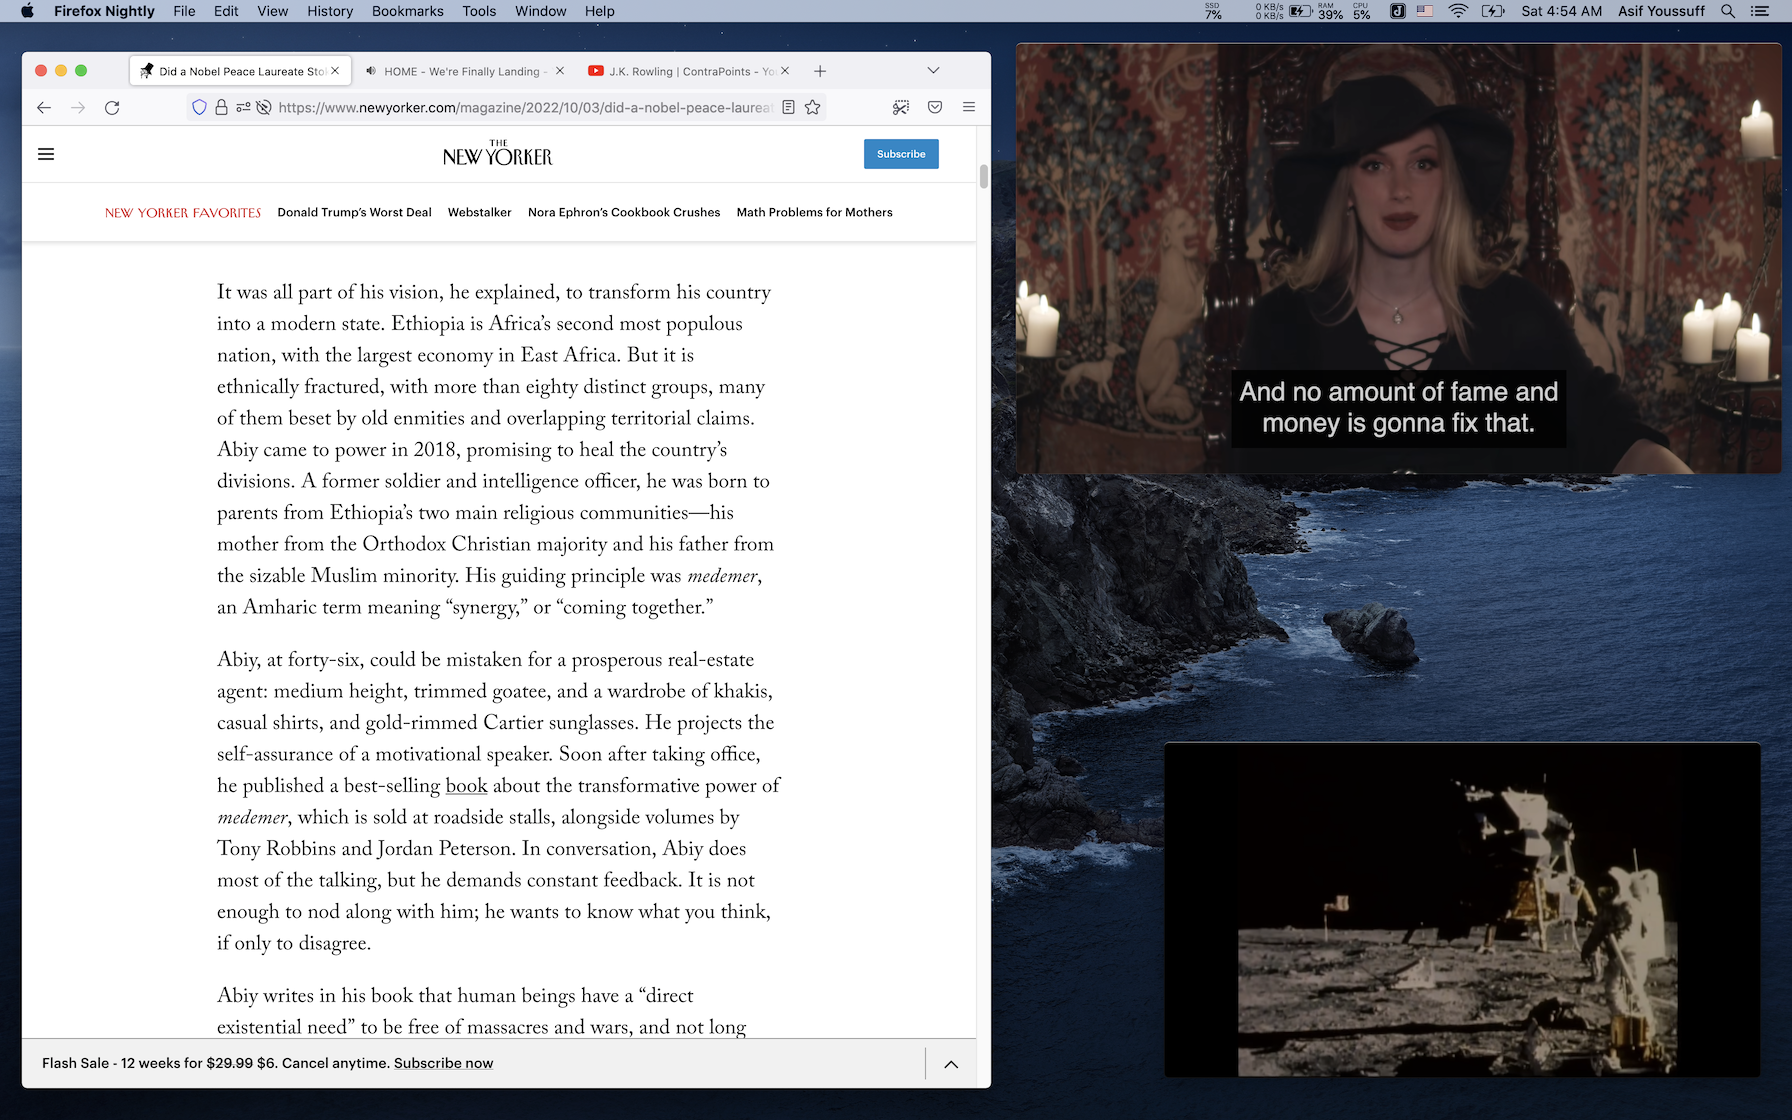
Picture-in-Picture is something you may remember from your TV, and the idea in Firefox is similar – pop out a video from a web page so that you can continue working in another tab – while continuing to watch the video.
This feature can be really useful if you want to watch a lecture while following along, or just to watch music videos while browsing the web.
When you load a video, Firefox overlays a PiP toggle over the video:


This feature is great on its own, but Firefox has more recently added caption support for many video players around the web, and it also has Multi-PiP – which lets you pop out more than one video.
My brother uses this all the time to watch several live sports at once on many nights – it can be a game changer.
Staying Safe on the Web (Ad Blocking)
One of the reasons you may be giving Firefox a look now is that competing browsers are working to weaken ad blockers on the web. There has been a lot of articles about the situation, and the EFF has a good summary of what is happening. In short, Chromium browsers (that includes most browsers – including major names like Google Chrome and Microsoft Edge) are dropping “blocking webRequest”, a feature that enables browser based ad blockers to effectively disable the worst offenses of online scams and advertising. Safari has never had this feature, unfortunately.
Currently, the best (fastest, most effective) browser based ad blocker is uBlock Origin, which already works best in Firefox. The developer of uBlock Origin has raised the alarm about the changes in Chromium and how they will weaken uBlock Origin.
Competing browsers insist that they can stay ahead of the changes in Chromium by simply building in ad blocking into their browsers. Unfortunately, the effectiveness of those solutions pale in comparison to what is available in Firefox + uBlock Origin today and into the future.
The choice is clear – if you want the best ad blocking available, you want Firefox.
I will note that I actually prefer a more measured approach to web safety and annoyance blocking – but this is a guide for people new to Firefox, so I am including the simplest and easiest solution possible. If you consider yourself to be more advanced, I detail my own setup in an earlier post: How I Learned to Stop Hardening and Love Strict Tracking Protection.
Troubleshooting
There shouldn’t be a need for extensive troubleshooting – and I’m not going to include instructions here. There’s a good community on reddit that you can visit with specific questions.
However, there are two things that come up often that are worth detailing.
Video Playback
There are various reasons why your operating system may not include non-royalty-free, patented video codecs. If you find that your copy of Firefox doesn’t play video, you can resolve that issue by installing the codecs:
webcompat
If you come across a site that doesn’t work as expected in Firefox, but it works in other browsers, you may be seeing a web compatibility issue.
Most of the time, these issues are caused by web developers not testing their sites on Firefox, but sometimes, they are Firefox issues. You can report issues to webcompat if you run into sites that don’t work as expected.
Before you report an issue, try to do a little investigation on your own – like testing to see if the issue happens in a new profile. If the issue happens in a fresh profile, you may have something worth investigating – help make the web better by reporting the issue.
Original Source: Firefox Switch: A Guide for Beginners (quippd.com)


